Hey Everyone today I’m here to tell you about how to pass value from one page to another or we can say Navigation between Pages. Like if your app contains more than one xaml page and you need to use that information around different pages so what to do.
- Create an empty project in Visual Studio 2013, make sure it is a Windows Phone SilverLight project.
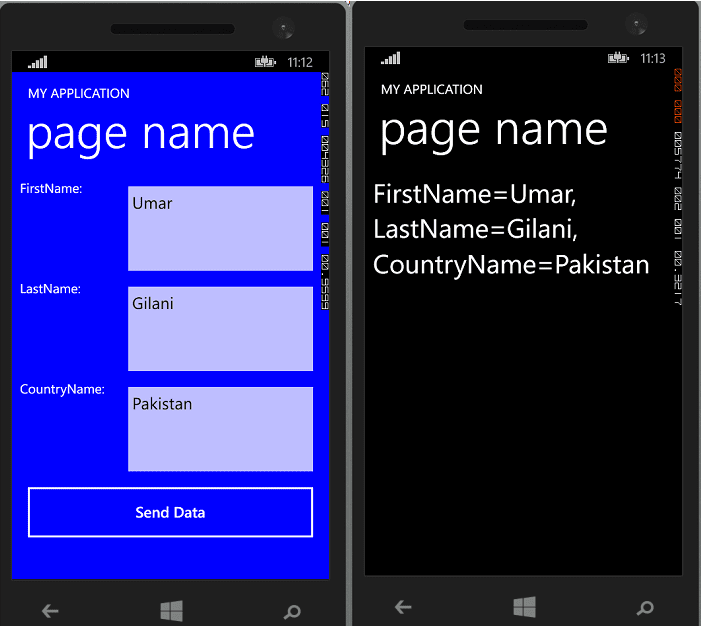
- When you are done, place some text boxes, in which you will place the value and Navigate those value to the next xaml page.

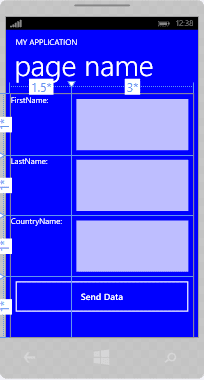
- When you are done with making text boxes make sure you add different names to text boxes and after that place a button that will help you navigate through pages.

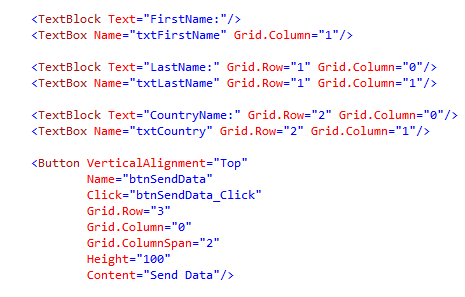
- Forget the Grid.Row, Grid.Column for now. But if you use rows definitions and columns definitions than this would be a good practice for you.
- Now move towards the page MainPage.xaml.cs but before that create a event for the button that you have placed. You can do it either by double clicking the button that is animated on the Mainpage.xaml or either by doing following.

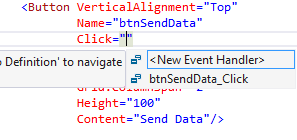
- If you click on the New Event Handler this will create a event for you, for that specific button.
- When you will now move towards the MainPage.xaml.cs then you will see a event that is created for that specific button.
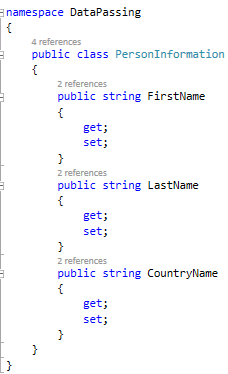
- Lets now include a class that with a name PersonInformation.cs. You can add the class by right clicking the project solution, then moving towards add and then clicking class. A Window shall open give your class a name as above and press Okay.
- I have taken three attributes in my class FirstName, LastName and CountryName. Make their getters and setter as shown.

- Now add one more xaml page in your solution. The same steps that I told you above but now instead of choosing class choose New Item, then select the very first options that is Windows Phone Portrait Page give you page a name like I have given OtherPage.xaml.
- Open OtherPage.xaml and just add a textblock.


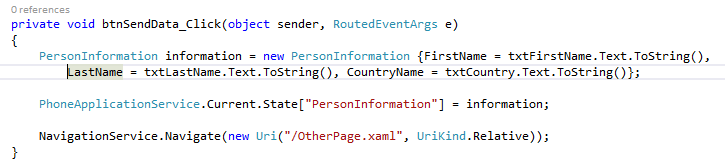
- Now move towards MainPage.xaml.cs and write the following piece of code under the button event you created earlier.

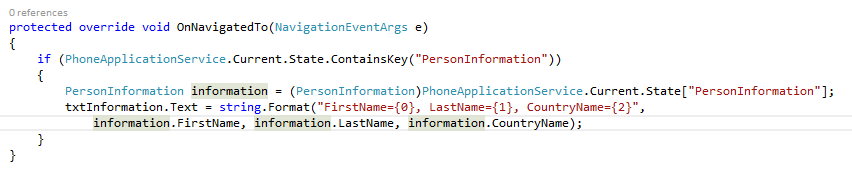
- Move towards OtherPage.xaml.cs and re write the following code.

- So what have PhoneApplicationService.Current.State. PhoneApplicationService.State Property states that it is used to get the dictionary used for passing an application’s state between invocations. Each and every Windows Phone application containing PhoneApplicationService which is defined in Microsoft.Phone.Shell. Every application has its one PhoneApplicationService defined in its App.xaml file of a Windows Phone project. We can use this service’s property called “State”. These “States” are all transient data which means they are available only for one instant of your application which means once you restart your application, these states will be lost.
- And then the next line states that we are moving towards the next page and have written the name of page in quotes.
- Now the over ride OnNavigatedTo function that we have written is usually called when we are navigating between pages, so this is the function that will be called on pressing of the button.
Download the Sample Code from here